Tuesday, February 17, 2015

I'm still alive!


Firstly, I want to apologize for absolutely poor posting on a new blog.  To make a long story short, my "work life" has been stressful and I've just been too exhausted to post whenever I am around my laptop!

I have a couple new blog posts in the works, including a new tutorial/swatches of some of my favourite shadows!

Until then, here are some of the eye looks I've been sporting lately:


Tuesday, January 27, 2015

Eotd - Electric Animal


Today's look was mostly done using shades from the Urban Decay Electric Palette. 

Products used:

Hard Candy Eyeshadow Primer
MAC Shadows - Kid, Saddle, White Frost and Brule
Urban Decay Electric Palette shades - Chaos and Gonzo
MAC Old Gold Pigment
Loreal Voluminous Mascara
Kiss Lashes in No. 11


1.  First I used a mixture of MAC Saddle and Kid in my crease to transition the brighter colours to come.

2.  Using a small shader brush and patting motions, I placed Chaos first in the inner and outer corners and blended inwards on the lid, and then placed Gonzo a little further in, blending inwards and towards the crease.

3.  Using a mix of Saddle and Kid, I reblended the crease to blend out the blue shades just added to the lid. 

4.  Using another flat shader brush, I packed MAC Old Gold onto the center of the lid, and blended outward adding more Gonzo and Chaos as needed to blend seamlessly.  I applied all the shades similarily onto my lower lash line.

5.  Using MAC Brule and a large fluffy brush I blended all edges on my upper and lower lash lines.

6. Finishing up I placed White Frost on my brow bone and blended it out, and added Mascara and falsies.

Who else is loving the electric palette!

Monday, January 26, 2015

LoTR Tutorial sneak peeks.


Watery eyes and eye issues abound making makeup hard for the last week, but here's a sneak peek at what's to come, some Lord of the Rings themed eye looks and tutorials! Can you guess the inspiration for each look?

Wednesday, January 21, 2015

Tulip placement tutorial

So today’s look is going to be a “tulip placement” tutorial.


Tulip eye shadow placement involves darker shades around the inner and outer perimeter of your eyes, with a pop of lightness or colour on the center of the lid.  This eye shadow placement typically looks its best when on people who have a generous amount of lid space, but it’s gradually becoming my go to favourite.  

You can use any shade range you’d like, from soft and light neutrals to bold contrasting colours, but what is important is seamless blending.   The center of the lid must be blended believably into the inner and outer corners, and the crease must be blended out softly for a flattering and finished look.

So let's get started!


1.  Prime your eyelids and apply any necessary base for your colours to pop.  Primer extends the life of your eye look and keeps your lids from creasing, and a base provides either a texture for pigment to grip to or a lighter colour to really make the eye shadow you apply brighter.

2.  Start with your transition colour.  Apply it into your crease with a large fluffy brush then take this on your inner and outer corners to help transition the colours there later.


3.  This is really your choice because it can be done with blending or with multiple shadows.  You can either apply your dark colour and blend or use a medium then darker shade in the same tone.  I’m taking a shade darker than my transition colour but lighter than my final colour to help keep the blending soft and seamless.  I apply the heaviest amount of pigment on my very outer corners and blend inward with a denser blending brush.  Finally with a larger blending brush and no product blend this into your crease to darken it up.  Apply more shadow into your crease if need be, but keep it softer than the inner and outer corners.


4.  Taking my darkest shade I apply this concentrating on my outer and inner corners and then blending inwards using the same brush on step three.  If it’s too dark and the edges are too harsh, I will take my medium toned shade and use that to blend out the darkest shade some more.  Take your large fluffy brush and again blend this into your crease.  We still want the crease to be lighter so don’t apply anymore colour just blend what you’ve already laid down.


5.  Time for your pop of colour! Take the shade you’ve chosen for your lid, and pat it on.  To help blend it, take some of the shades from your inner and outer corners and blend inwards to the new colour, or blend outwards with the new colour into the darker colours.    Blend it all out with a light shade above your crease to keep it fading to your skin tone.


6.  Mascara, liner (if you choose to) and lashes.  Smudge the colours in a similar pattern under your eyes. 


Tuesday, January 20, 2015

Brush Maintenance!

Due to some irritated eye issues, today is going to be about brush maintenance!

Brushes are a pivotal part of makeup application.  A good brush can make up for a poor performing product and a great brush can be kept for years, so it's important to take the proper care of your kit.

When you use a brush it can have a large build up of product, bacteria and a lot of other not so fun things that you probably don't want to think about.  Now if you're just using them on yourself, constant sanitation may not be your goal, but keeping them in top shape is always a good idea. 

The key to proper brush maintenance is knowing what your brush is used for, knowing what your brush is made of, and knowing how to keep it in shape.  Some brushes do not benefit from constant washing, some only require spot cleaning, and some should be cleaned for every application.

Face brushes are important to keep clean.  Think of all the oils and bacteria on your face.  Think of all the oils and bacteria that can transfer.  A dirty brush is a haven for bacteria to multiply and it can wreak havoc on an acne prone skin.  It's important to keep whatever is going to be in contact with your face clean.  These are the ones I'd recommend cleaning the most often.    Eyeshadow brushes should be washed, but it's not necessary to wash them every use.  You can spot clean a brush enough so that you can keep using it without worrying about the muddying of colours on it. 

There are differing opinions on what to use to clean your brush, and with so many options who is to know whose choices are the best. What I'm suggesting are just some products that work well for me.

Johnson's Baby Shampoo:  This is a cheap option for a nice deep clean.  I usually use this once a week for my worst brushes, to get them nice and spotless for the new week.

MAC Brush Cleaner: This is good for a spot clean when you don't want to deep clean your brush, but I find it still has a drying period so it doesn't really help when you need a clean brush immediately.

Cinema Secrets Brush Cleanser: This is amazing for instant spot cleaning.  It does have a strong vanilla like scent but your brushes are immediately dry and ready to use again.  I like this when I have to switch between colours with my favourite brush.

Dove Bar Soap: This is what I use to clean my Beauty Blender and blending sponges.  It gets them clean, it's gentle and what else can I ask for?

How often do you clean your brushes?

Monday, January 19, 2015

Posting schedule

Hi friends!

I've been trying to decide how I want to stagger my posts and while originally I wanted to post daily, I also work full time and work has been very trying these last few days.

So because of this, I've decided on a three times a week (Monday, Wednesday and Friday) posting schedule. This post doesn't really count so what I'm going to do is have a new tutorial up for tomorrow and go from there!

Thank you for taking the time to read my blog and the things I've had to say so far, and here's to new content!

Cheers

Friday, January 16, 2015

Eyeshadow Placement

Today I’m going to go over the basics of eye shadow placement, and show you an easy to replicate way of doing your makeup. 

A very typical eyeshadow placement is something like this:


All of us have probably seen countless tutorials in which many different colours, textures and finishes are used but the placement is the same.  There are reasons for this.  This is generally one of the most flattering placements for a wide assortment of faces and eye shapes.  The lighter shades in the inner eye open up the eye and make it appear wider, the darker shades in the crease of your eye provide some depth to your face.  It’s a very tried, tested and true formula but is happily easy to recreate. 

As always, the shades I’m using are not needed to do this look.  What I’m going for is to show you ways to use this placement for a multitude of colours.  I’m using what’s flattering to my skin tones and eye shade, and what’s already in my stash and readily available.  This can be recreated with all sorts of colours, from neutrals to brights and glitters.  Unfortunately I don't have photos to accompany the steps today as I had an early start, but it's a very basic look and should be easy to follow!

1.  Prime your eyelids.  I always include this step because my eyelids are very oily.  The primer keeps my eyeshadow lasting all day and keeps the colours appearing brighter.

2.  Back to my best friend the transitional shade.  Even if you’re using all brights, a transitional shade in a colour slightly darker is going to be highly helpful to you when blending. 

3.  Take a colour slightly darker than your transitional shade to deepen the crease.  Blend with a large fluffy brush.

4.  Take a colour that is lighter than the previous colours and apply it all over your lid.  Blend into the crease with the same large fluffy brush.

5. Take a colour that is the lightest of the shades you are using and highlight the inner corner of your eye.

6.  Finally, take the darkest shade and apply it directly to your outer eyelid, and blend.  You can finish it up with blending darker shades under the lower lashes or eyeliner to complete the look.


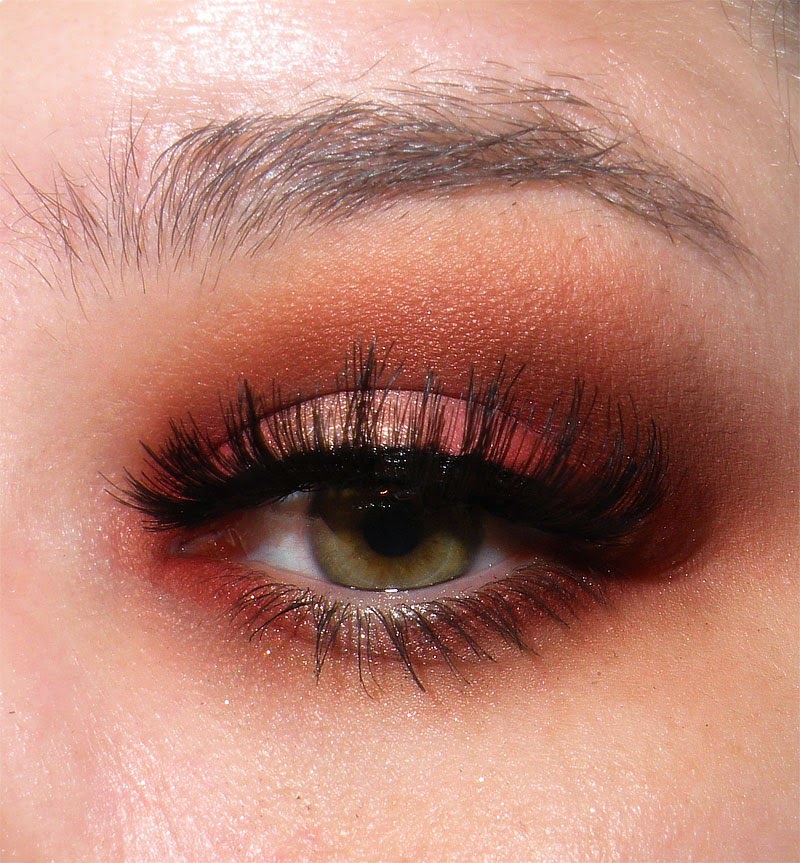
And the finished product:


With 4 colours of a similar shade ranging from lightest to darkest, you can reacreate this in so many ways!